Search This Blog

Wednesday, October 2, 2013

Deploy SCCM 2012 SP1 CU3 Client Update via Application Method


In this post I will discuss and show how to deploy the CU3 Client Update using the Application Method instead of the auto-created Packages.  When you go to install CU3 on your server you are given the option for it to create the packages necessary to patch secondary servers, clients, and consoles.  Packages do not offer the flexibility for targeting, requirements, dependencies, automatic re-deployments, and so on.

The inspiration for this post comes from Michael Leach in which he provided instructions on how to do this for the CU2 update.  I borrow some of the items from his post but end up using a different detection method and create a custom query for a collection including all SP1, CU1, and CU2 clients.  His post can be found here.  Thanks, Michael!


  1. Obtain the CU3 bits and read on the updates and changes it provides.
  2. Apply the update to your Primary Server and follow pertinent steps, including creating the necessary update packages.
  3. Locate the packages that you will use as your Content paths in the Application in the following location: "\\(Server)\SMS_(Site Code)\hotfix\KB2882125\Client"

  4. We are now ready to create the Application for the update.  These are the steps and settings that I set up.
    1. Manually specify the application install.
    2. Create two deployment types, one that will apply to your x64 clients and one that will apply to your x86 clients.  Specify the pertinent requirements using the Operating System level options.
    3. Choose the proper Content locations from step 3 for each of your deployment types.
    4. The command-line for the installs will be the following:
      1. msiexec.exe /p "configmgr2012ac-sp1-kb2882125-i386.msp" /L*v %TEMP%\configmgr2012ac-sp1-kb2882125-i386.msp.LOG /q REINSTALL=ALL REINSTALLMODE=mous
      2. msiexec.exe /p configmgr2012ac-sp1-kb2882125-x64.msp /L*v %TEMP%\configmgr2012ac-sp1-kb2882125-x64.msp.LOG /q REINSTALL=ALL REINSTALLMODE=mous
    5. For the Detection Method I used the version of CcmExec.exe:


                 6. Distribute your content
                 7. Test on a group of clients, both x64 and x86, to ensure everything is working as planned.
                 8.  For Collection targeting, I created my own which included the SP1 RTM Clients, CU1, and                         CU2.  Remember that 2012 RTM Clients will automatically upgrade when you install SP1, so                       long as you have the client automatic updates configured correctly.  After that, you are                                   responsible for deploying relevant CU's.
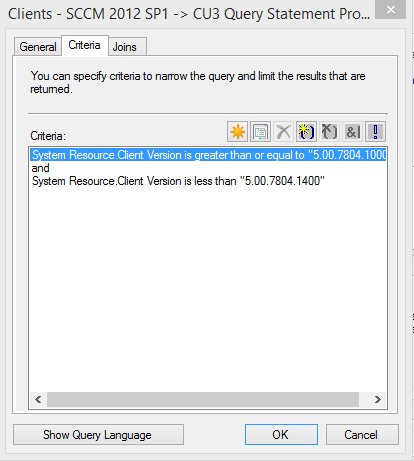
                  9.  For my query I used the 'System Resource.Client Version' criteria specifying clients that were                        at 5.00.7804.100 (SP1) or greater and less than 5.00.7804.1400 (SP1+CU3).


Tuesday, July 9, 2013

Machine will not join domain after OSD Task Sequence in SCCM 2012 SP1

I was fighting with an interesting issue the past few days.  I had a single Operating System Deployment (OSD) Task Sequence (TS) that I deployed to three different models of laptops for testing.  I 'Auto Apply Drivers' based on the category of the machine and use a WMI Query to determine the model of the machine and apply the task appropriately.


The problem I had was with one particular model that did not join the domain.  I logged into the machine locally and saw that it installed all the needed drivers, the TS had no failures, and I was able to join the machine manually.  It wasn't a credential issue or an issue with the image because this same TS was completely successful on other models.

What I oddly had to do to fix it is that instead of 'Auto Applying Drivers' based on Category, I had to apply the entire driver package.  This completely fixed the issue so the NIC driver must not have initialized correctly through the TS and failed the domain join.  Remember that the domain join step in your TS only appends the unattend file with the proper information and then Windows Setup does the actual joining to the domain.  The success of that single task is separate from the actual success of joining the domain.


When I have some extra time I'll try to determine if it is a model issue, or driver variation for that particular flavor of NIC.  In case you were curious, this was on an HP Probook 6560b with 32-bit Windows 7 and an Intel 82579V NIC.

Thursday, May 30, 2013

Re-purposing low-end PCs using VMWare View, Windows ThinPC, SCCM 2012, and Microsoft Security Compliance Manager

In this post I will go over how to re-purpose low-end PCs as "Thin Clients" for VMWare View.  Essentially we need to replace the Windows shell so that users are only prompted to log in through the VMWare Horizon View Client and nothing else.  With this comes additional challenges and caveats.

List of assumptions for this post:

  1. Understanding of Group Policy and Active Directory
  2. Understanding of SCCM 2012, specifically creating and deploying Packages and Images through Task Sequences.
  3. Basic understanding of scripting, mostly simple batches.
  4. Understanding of Horizon View, creating Pools based on snapshots and general syntax for installing and customizing the Client
  5. Basic understanding of the underlying functionality of Windows 7, registry, core components, and variants


To get started, you will need the following:

  1. Microsoft Windows ThinPC (aka Windows 7 Embedded).  This will be available through the Microsoft Volume Licensing Site if you have Software Assurance with your Microsoft Agreement.
  2. Microsoft Security Compliance Manager
  3. Microsoft System Center Configuration Manager 2012 (SCCM 2012).  You can figure out how to deploy your image utilizing another tool but for this post I will only be providing instructions for SCCM 2012.
  4. VMWare Horizon View setup with a Pool in place.  This post assumes you know how to provision your pool for end-users
  5. VMWare Horizon View Client.  You will need the latest x86 version as ThinPC is only 32-Bit.
  6. The JCOS Installation Files for replacing the Windows Shell.
  7. A reference machine for creating your image.  I recommend firing up a Virtual Machine in Virtual PC, VMWare Workstation, or VirtualBox.
Prepare you reference machine:
  1. Create a Virtual Machine to boot from the ThinPC ISO.  Complete the install.
  2. Install the SCCM Client.
  3. Install the View Client.  I recommend doing this with a custom batch file that contains your server address and other information, otherwise you can customize this later via Group Policy.
  4. Copy the latest View Client Administrative Template for Group Policy to a network location.  You will find it here: "C:\Program Files\VMware\VMware View\Client\extras\vdm_client.adm"
  5. Follow the steps on the JCOS site, run their script and then let it reboot the few times that it needs.
  6. At the end you should be looking at a black background with the Horizon View Client ready to login.
  7. Now capture your reference machine into an image using a Required client-based Capture Task Sequence.
  8. Import the image into SCCM and distribute the content as usual.

Group Policy and Client Customizations:
  1. Since the machines will be joined to the domain you can control much of the settings from a Computer-Based Group Policy Object (GPO).  
  2. These are the general settings you'll want to apply to your Thin Clients.  Create a new GPO and import the 'vdm_client.adm' we talked about earlier.  Use these settings as a guidance:
    1. VMware View Client Configuration/Scripting definitions
      1. Connect USB devices to the desktop when they are plugged in (Enabled)
      2. Desktop Layout (Enabled - Full Screen)
      3. DesktopName to select (Enabled, enter in the name of the Pool you want the users to automatically log into)
      4. Logon DomainName (Enabled - NetBIOS of your Domain)
      5. Server URL (Enabled, View Client URL used to connect to Pools)
    2. VMware View Client Configuration/Security Settings
      1. Certificate verification mode (Enabled - No Security)
      2. Default value of the 'Log in as current user' checkbox (Disabled)
      3. Display option to Log in as current user (Disabled)
      4. Enable SSL encrypted framework channel (Enabled)
      5. Ignore certificate revocation problems (Enabled)
  3. You'll also want to disable the 'Shade' on the View Client Window that is enabled by default.  This is a registry setting which can be applied during our Deploy Task Sequence as a Package.
    1. HKLM\SOFTWARE\VMware, Inc.\VMware VDM\Client
      1. REG_SZ Key: EnabledShade
        1. Value: 0
Microsoft Security Compliance Manager and LocalGPO Tool
  1. You'll  notice that the machine is logging in by default using a local account which you cannot remotely manage using Group Policy.  The problem arises in that some of the settings you want to manage are only available via a User-Based GPO and that will not work for a local account.  You can either manage the local Group Policy settings on your reference machine prior to capturing it, or you can utilize the LocalGPO Tool within the Microsoft Security Compliance Manager and capture these local Group Policy settings and then apply them to your machines as a Task in your Deploy Task Sequence.
  2. Install Microsoft Security Compliance Manager (MSCM) on a reference machine.
  3. Navigate to where you installed MSCM and find the LGPO folder.  Copy this to a network location, you'll need it and want to use it in the future.
  4. Fire up another ThinPC Virtual Machine and install the LocalGPO.msi found within the LGPO folder.
  5. Create a folder called 'GPBackups' at the root of C:
  6. After LocalGPO is installed, navigate to where it is installed.  Here you will find a 'command-line here.cmd' file.  Copy and paste this in the same folder and rename it 'ExportLocalGPO.bat.'
  7. Edit that file and modify it so it looks like the following:
    1. @Echo off
    2. ECHO.
    3. ECHO LocalGPO Tool
    4. ECHO ____________________
    5. ECHO.

    6. %~d0
    7. CD %~dp0

    8. cscript //H:CScript //B //NoLogo
    9. cscript LocalGPO.wsf /path:C:\GPBackups /export /GPOPack
  8. Now we need to modify the local Group Policy before we capture the settings.
  9. At the 'run command' type in 'gpedit.msc'
  10. Much of what you'll want to configure will be found under:
    1. User Config - Administrative Templates - System - Ctrl+Alt+Del Options
      1. Remove Change Password (Enabled)
      2. Remove Lock Computer (Enabled)
      3. Remove Task Manager (Enabled)
      4. Remove Logoff (Enabled)
    2. Feel free to configure any other User Configurations.  Remember, the computer ones we can do over the network via a standard GPO applied to the targeted Organizational Unit.
  11. Now go back and run 'ExportLocalGPO.bat' (Run as Administrator).
  12. If everything completes successfully, go to C:\GPBackups and you should see a file with a long GUID name.  Copy GPBackups to a network share in it's own folder.
  13. Within GPBackups on the network share, create a batch file called 'ImportGPOPack.bat'
  14. Here is the syntax on what to put into that batch file:
    1. cscript "%~dp0{GUID}\GPOPack.wsf" /Path:"%~dp0{GUID}" /silent
    2. This will apply those local GPO settings to a remote machine.
  15. Create a Package within SCCM.  The Source Files should point to 'Network Share\GPBackups' and the command to run will be 'ImportGPOPack.bat'
  16. Test Deploying this Package to a machine prior to adding it to your Deploy Task Sequence.


Final Deploy Task Sequence
  1. Within the JCOS folder you downloaded, copy the 'sysprep.reg' file to a lone folder on a network share.
  2. Create another SCCM Package with the above folder as the source files and for the command line specify 'regedit /s sysprep.reg'
  3. Look at the settings within 'sysprep.reg' and then deploy the package and ensure it does what it is supposed to.
  4. Create a Deploy Task Sequence
  5. Specify the image as the one you originally captured
  6. Go through the standard list of tasks, including any Driver Packages you have set to apply to your specific machines.
  7. At the end of the Task Sequence, create another Task Sequence Group called 'Post ThinPC Settings'
    1. Add a Package and choose your 'ThinPC Sysprep Package'
    2. Add another Package and choose your 'ThinPC ImportGPOPack Package'
    3. Add another Package and choose your 'ThinPC Disable View Shade'
    4. Follow it all up with a 'Restart Computer' and specify booting to local OS, NOT WinPE as to avoid Client Provisioning issues.
    5. Deploy
    6. Test
    7. Test some more..

Reference Links:
  1. Backing up and restoring the Local GPO (There are some syntax errors in this link)
  2. Backup and restore the Local GPO (There are some sytax errors in this link)
  3. VMWare Horizon View 5.3 Client Install (See page 20 for details)
  4. How to Build a Thin Client on Existing Hardware